
Technology Note 209
KinExA Pro Software Shortcuts
When creating new experiments, template files can be used as starting points for most of the experiments you want to perform. The most common changes made from these template files are changing the sample set, adjusting flow parameters, and entering the concentrations for the samples you will be using. Below are example shortcuts designed to minimize user input in modifying experiment timing to your needs.
Entering Sample Sets (KinExA® 3200)
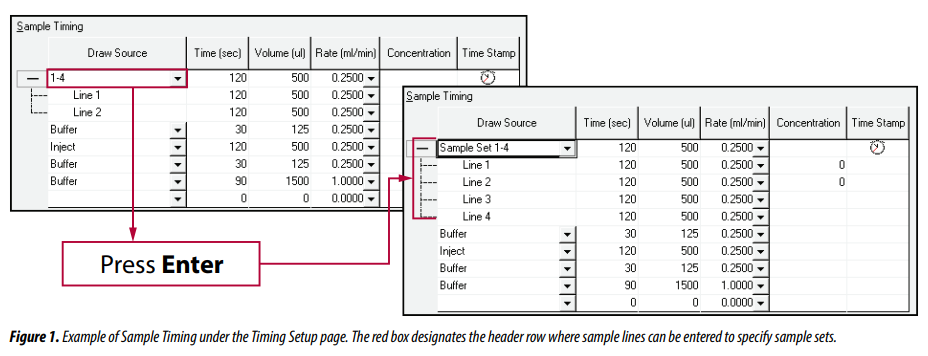
A sample set is displayed under Sample Timing on the header row, with the individual samples listed below and indented from the other timing lines. The header row describes the sample set and can be used to change the sample set. The Draw Source column is the sample location, and the Time, Volume, and Rate columns list the flow parameters used for that sample.
Specifying Sample Lines
A simple command typed into the header row, Draw Source column can be used to set the number and location of sample lines. Usually samples are placed in sequential order, such as lines 1 through 4 or lines 1 through 12. When samples are placed on contiguous sample lines, use a dash to span the number of sample lines. For example, sample lines 1 through 4 would be 1-4 (see Figure 1) and lines 1 through 12 would be 1-12. When you press Enter the software will change the number of samples in the set, and arrange them in the order specified. To span the same lines in descending order, reverse the order of the numbers. For example type 4-1 and then Enter.
Specifying Non-Contiguous Samples
Non-Contiguous samples entered with a comma can be used along with contiguous samples entered with the dash. For example, to use sample lines 1 through 5 and sample line 13, type 1-5,13 then press Enter.
Specifying Buffer
Buffer can be specified in any part of a sample set by substituting a B in place of the sample line. To include the buffer as part of a sample set with 4 samples, type B,1-4 and then Enter. To include buffer as part of a sample set in descending order, type 4-1,B then Enter.
Repeating Lines
Sample lines can be repeated multiple times within sample sets. For example, to specify a sample set using lines 1 through 8 with the 4th line repeating 3 times, type 1-4,4,4-8 then Enter. To specify the same sample set in descending order, type 8-4,4,4-1 then Enter.
Entering Sample Sets (4000/Autosampler)
The 4000 & Autosampler work the same as the 3200 except the rack number must be specified. The first digit of a 3 digit number specifies the rack number and the last two digits designate the tube number in that rack. For example, a tube in the 38th position on the 3rd rack would be 338. Below are the numbers associated with each rack and examples of how to input them into the software.
Standards Rack
There are 6 possible tube positions in the standards rack. To span all 6 tubes, type 1-6 then Enter. For descending order, type 6-1 then Enter. Remember that the Standards Rack is numbered from left to right, and the sample racks are numbered from right to left.
Samples From a Single Rack
When using one rack and contiguous samples, use a dash to separate the starting tube number from the last tube number. For example, to designate Rack 1, tubes 1-16 type 101-116 then Enter. For descending order type 116-101 then Enter.
Spanning Multiple Racks
Multiple racks are designated by commas. For example, to designate tubes in the Standards Rack in the 3rd position, Rack 1 in the 11th position, Rack 2 positions 15-19, and Rack 3 positions 12-14 type 3,111, 215-219, 312-314 then Enter.
Setting Time, Volume, and Rate in a Sample Set
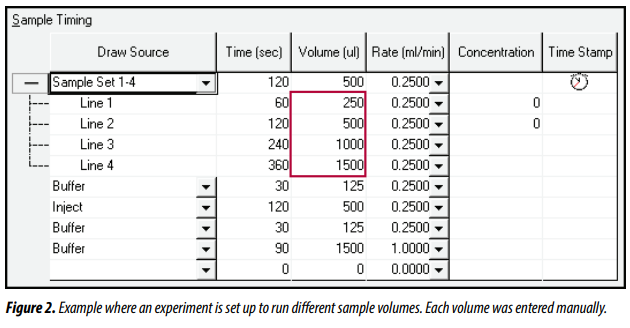
The Time, Volume, and Rate parameters specified in the header row of a sample set will be used to set the flow parameters for each individual sample. When a change is made in the header row, all of the samples will change accordingly. An individual sample can be changed from the others by modifying the parameters on that sample’s row (see Figure 2). Note that if you change the header row of a sample set after changing an individual line, the parameters on the individual sample will be overwritten with the parameters on the header row.
Entering Concentrations
Concentrations may be entered in a similar fashion to sample sets by typing into the header row, Concentration column. Samples are usually a dilution series, either serial or linear.
You may use any of the arithmetic operators ( * / – + ) to designate concentration dilutions, however only one arithmetic operator can be used in any command. A comma is used to separate individual concentrations from the dilution series. Note that the number to the left of the arithmetic operator is assumed to be the concentration. Further, when entering concentrations it is important to include Molar units, i.e. mM, uM, nM, pM or fM. If the units are not specified, nM will be assumed.
Entering Dilutions
To enter a 2 fold serial dilution with a starting concentration of 400pM and ending at 0, type 400pM/2,0 then Enter (See Figure 3). For a linear dilution of 25 starting at 300pM type 300pM-25 then Enter.
Reversing the Order
The ^ symbol, when placed at the end of the command, reverses the order. For example, in Figure 3 typing 400pM/2,0^ then Enter would result in Line 1 being 0, Line 2 being 6.25pM etc.
Specifying NSB
NSB can be included as a concentration unit for any sample set. To designate NSB use a comma to separate it from the other samples. A sample that is designated NSB will automatically be ignored during analysis. For example, type 400pM/2,0,NSB then Enter.

Specifying a Mixed Dilution Series
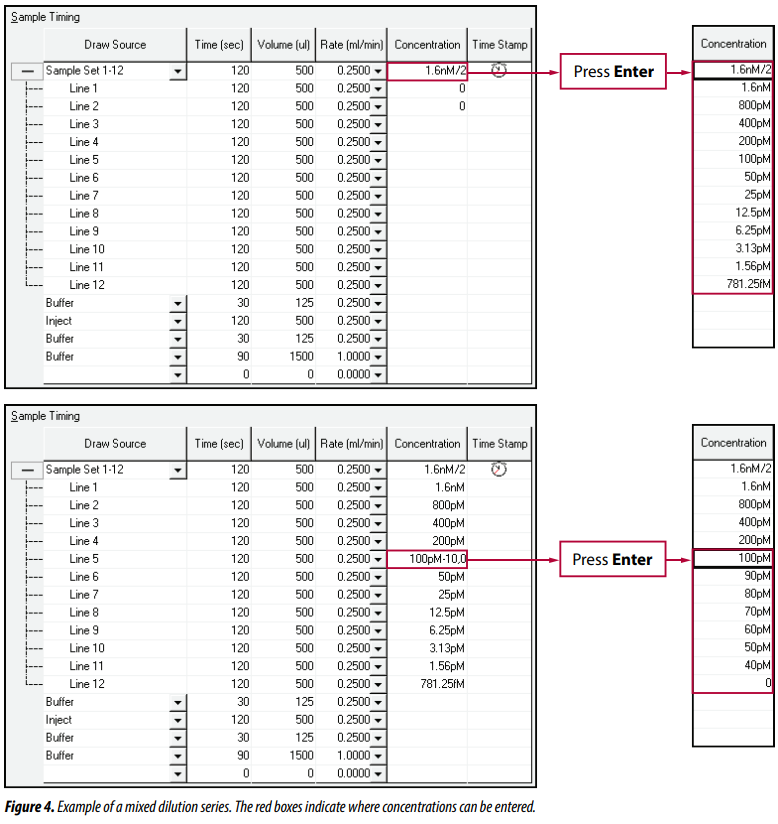
Suppose you would like an experiment in which the sample concentrations are a 2 fold serial dilution from 1.6 nM down to 100pM, but then proceed as a linear series from there. This may be useful for a kinetics curve, or where you would like more data points around 70 pM. Only one arithmetic operator is allowed, but you can restart the dilution on any sample line. Referring to Figure 4, the serial dilution is entered first by typing 1.6nM/2 then Enter in the header row, Concentration column. Next, place the cursor in the Concentration column of sample Line 5. Type 100pM-10,0 then Enter.
These sample shortcuts are designed to be simple and intuitive for filling out the sample timing page. Note that the timing parameters cannot be changed after an experiment is run, but the concentrations can be changed if needed. Changing concentrations after an experiment is complete must be done on the Binding Signals tab, not the Timing Setup tab. The same shortcuts may be used in the Concentration column on the Binding Signals tab. You must re-analyze an experiment after changing concentrations using the analyze button for changes to take effect.
Microtiter Sample Well Locations
Designating the sample well locations is similar to the way the sample tubes are designated on other rack types. In the example shown in Figure 5A for rack 2, the sample set would read 201-212. The first digit (2) specifies rack 2, and the last two digits specify the well numbers. The well numbers move from right to left, then down, starting at the top right corner.
An alternate way of designating samples is to use the row and column designations normally used for microtiter plates. See the example shown in Figure 5B for rack 3. The sample set would read 3:A1-B4. The number before the colon (3) specifies the rack, and the numbers after the colon specifies the wells. The sample selection moves down, then right to left, starting at the top right corner.
