
How to Guide 226
Rinsing the 4-Way Connector
How to Guide 226 • HG226R0
Rinsing the 4-Way Connector
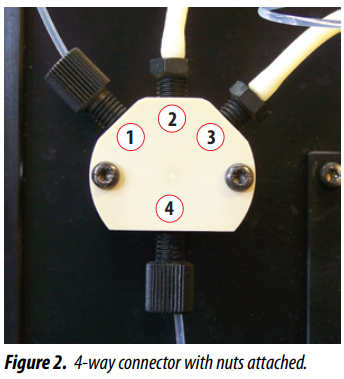
- Disconnect the four tubing nuts from the 4-way connector (Figure 2). Nuts in positions 2 and 3 may be tight so use a 5/16″ crowfoot wrench to loosen.
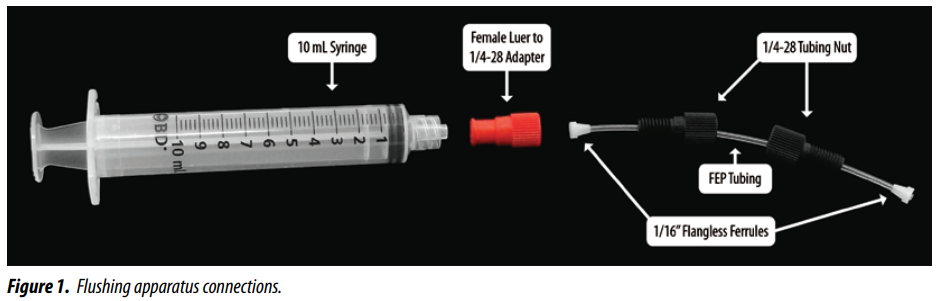
- Fill the 10 mL syringe with dH2O and then attach it to port 4 via the 1/4-28 Black Tubing Nut.
- Use two 1/4-28 Black Plugs to block ports 2 and 3 so that dH2O flushes out through port 1. Use a paper towel to cover the port being rinsed to collect the dH2O that flushes out.
- Once port 1 has been flushed, move the 1/4-28 Black Plugs accordingly so that port 2 and port 3 are flushed. Only one port should be flushed at a time.
- Once all of the ports have been flushed, re-attach the 4 tubing nuts to the 4-way connector. Refer to Figure 2 for correct tubing attachment.
- The tubing nuts in positions 2 and 3 need to be hand tightened and followed with a 1/4 turn with a 5/16″ Crowfoot wrench.
- Run several rinses to make sure that the clog was removed. If the clog does not clear, please contact Sapidyne for assistance.
Ferrule Installation Instructions
- 1/16″ Flangless White Ferrules should be installed on the tubing so that the tapered end faces the tubing nut and the flat end faces out (Figure 3).
- Be sure the tubing is pushed all the way through the ferrule before installing. When tightening the nut, hold the tubing in to be sure it is all the way in.

KinExA® is a registered trademark of Sapidyne Instruments Inc.