How to Guide 233
Sample Preparation for Kinetics Injection Experiments
This guide provides sample preparation instructions for a KinExA® Kinetics Injection experiment. For this method, the Constant Binding Partner (CBP) and Titrant samples are made separately, and the instrument mixes them together while controlling the reaction time.
The following protocol is recommended as it has been found to minimize error:
Step 1: Calculate Volume and Concentrations Needed
CBP (Constant Binding Partner)
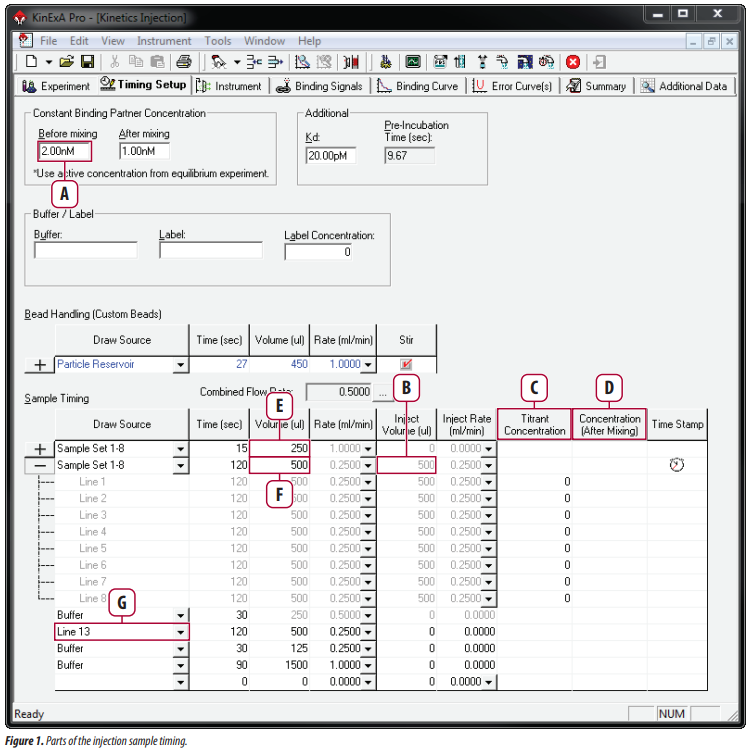
The CBP concentration is made at twice the final running concentration desired, since it will be diluted when injected into the stream of Titrant. The concentration of CBP is recorded in the “before mixing” box as shown in Figure 1A.
The calculation to find the minimum volume of CBP to make is:
Minimum CBP volume = (# of samples) × (Inject volume, Figure 1B) × (# of cycles) + (400 µL charge step) + (200 µL dead volume)
Note: Dead volume accounts for errors made in pipetting and sample loss in the mixing container.
Titrant Samples
The Titrant concentration is made at twice the concentration desired because it will be mixed with the CBP during the experiment. This is why there is a column for the Titrant concentration before mixing (Figure 1C) and a column that shows the concentration after being mixed with CBP (Figure 1D). The Titrant will be serially diluted in a background of sample buffer.
For each run, sample is drawn in two sample sets. The first sample set fills the line to the injection T (Figure 1E), and the second set mixes Titrant into the CBP sample (Figure 1F). These volumes need to be added together to get the total Titrant used per run:
Total Titrant volume per run = (Titrant precharge, Figure 1E) + (Titrant volume, Figure 1F)
The calculation for the minimum volume per sample is:
Minimum Titrant volume per sample = (Total titrant) × (# of cycles) + (400 µL charge) + (200 µL dead volume)
Note: Add extra volume to tube 1 for the titration series.
Label
Since the CBP is placed on the Injection line, the label must be placed on one of the sample lines. It defaults to line 13, as shown in Figure 1G. A different sample line may be used if desired.
Minimum label volume = (Label volume) × (# of samples) × (# of cycles) + (400 µL charge) + (200 µL dead volume)
Sample Buffer
The sample buffer used is usually the same for the samples and label and is prepared fresh for each experiment.
Minimum buffer volume = (Minimum Titrant volume per sample) × (# of samples) + (Minimum CBP volume) + (Minimum label volume) + (Dead volume)
Step 2: Sample Buffer Preparation
The buffer used for sample preparation is usually the same as the running buffer with the addition of 1 mg/mL BSA. This is used to help reduce Non Specific Binding as well as prevent material from sticking to the walls of the container. See Tech Note 219 — Reducing Non Specific Binding (TN219) for more information.
Step 3: Temperature Stasis
Allow time for both the samples and instrument to reach thermal equilibrium. The Kinetic parameters are sensitive to temperature, so steps should be taken to control it. Once the samples are at thermal equilibrium, the experiment can be started.
As an example, a 5 mL sample of buffer at room temperature takes approximately one and a half hours to reach 4°C.
KinExA® is a registered trademark of Sapidyne Instruments Inc.