
Technology Note 206
Minimum Sample Volumes
The Microtiter Plate Sample Rack (Part #: 414106, Figure 1A) is designed to support the use of 96 Sample Microtiter Plates and the custom 48 Sample Microcentrifuge Racks* (Figure 1B). The Microtiter Plate Sample Rack fits on the Autosampler and contains a spring loaded base to allow the sipper tube to touch the bottom of the sample plate or tube without causing a collision. Touching the bottom of the plate or tube minimizes the dead volume and dramatically reduces the sample volume required. Minimum sample volumes were determined experimentally with the 48 Sample Microcentrifuge Rack and Low Dead Volume Tubes (Figure 1C). This setup allows dead volumes as low as 10 µL.
Note: The minimum sample will be different if a 96 well plate or other tubes are used. KinExA Pro software version 3.4.5 or newer is needed to use a microtiter plate. Refer to How to Guide 240 Microtiter Calibration (HG240) to calibrate the microtiter plate sample rack prior to running samples.
Minimum Sample Volume Tests:
Samples were prepared in Low Dead Volume Tubes and placed in the 48 Sample Microcentrifuge Rack.
Four separate experiments were set up with either 1 µL, 3 µL, 5 µL, or 10 µL sample volume draws. In all four experiments, the constant binding partner concentration was high (relative to the Kd) and the binding was primarily driven by stoichiometry. The “concentration controlled” curves generated are suitable for measuring the Constant Binding Partner (CBP) rather than the Kd and the activity of the CBP was calculated by dividing the measured CBP by the nominal binding site concentration.
The residual error for the 1 µL sample draw was significantly larger than the larger sample draws (Figure 2) resulting in a correspondingly wide 95% confidence interval for the measured CBP (Figure 3).
Despite the increased error, the calculated percent activity was still within range of the experiments performed with larger sample draws.
Although sample volumes as small as 1 µL can be used successfully, slightly larger (3 or 5 µL) sample volumes are recommended to reduce error and narrow the confidence interval. Figure 4 shows duplicate measurements made with 5 µL sample volumes.

*Products can be purchased from Syringa Lab Supplies (www.syringalabsupplies.com) — 48 Sample Microcentrifuge Rack: Product # 21148; Low Dead Volume Tubes: Product # 22015
Minimum Sample Volume Tests:
Samples were prepared in Low Dead Volume Tubes and placed in the 48 Sample Microcentrifuge Rack.
Four separate experiments were set up with either 1 µL, 3 µL, 5 µL, or 10 µL sample volume draws. In all four experiments, the constant binding partner concentration was high (relative to the Kd) and the binding was primarily driven by stoichiometry. The “concentration controlled” curves generated are suitable for measuring the Constant Binding Partner (CBP) rather than the Kd and the activity of the CBP was calculated by dividing the measured CBP by the nominal binding site concentration.
The residual error for the 1 µL sample draw was significantly larger than the larger sample draws (Figure 2) resulting in a correspondingly wide 95% confidence interval for the measured CBP (Figure 3).
Despite the increased error, the calculated percent activity was still within range of the experiments performed with larger sample draws.
Although sample volumes as small as 1 µL can be used successfully, slightly larger (3 or 5 µL) sample volumes are recommended to reduce error and narrow the confidence interval. Figure 4 shows duplicate measurements made with 5 µL sample volumes.

Figure 2. Residual Percent Error Graph.
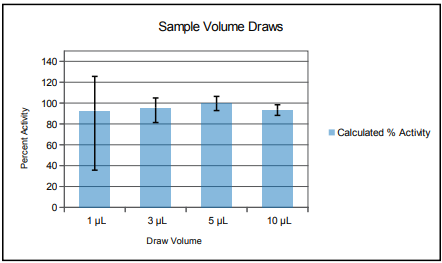
Figure 3. Calculated percent activity of the constant binding partner with 95% confidence interval error bars.

Figure 4. Binding curve and 95% confidence interval for 5 µL sample volume draws.

Figure 5. Timing file including an additional buffer step and modified buffer washes
Dead Volume Testing
The Low Dead Volume Tubes were also used to experimentally determine the minimum dead volume required. “Dead volume” is the extra volume added to ensure the full sample volume can be drawn without introducing air into the system.
As shown in Figure 1C, these tubes are specially made to closely fit the diameter of the sipper tube allowing immersion of the tip inlet in a minimum volume of liquid. For dead volume testing, 5 µL sample draws were chosen because of the narrow confidence interval and low residual error shown in Figure 3.
Dead volumes of 8, 10, and 13 µL were investigated. The percent activity and associated 95% confidence interval was calculated for each experiment (Figure 6). The recommended initial buffer step (Figure 5), done for consistency, was included in the timing file.
The large confidence interval using 8 µL of dead volume (Figure 6) resulted from bubbles being drawn into the bead pack. Based on these results, 10 µL of dead volume is sufficient for KinExA measurements lasting approximately 5 hours. If it takes longer than 5 hours to run the experiment or samples are left equilibrating without being covered, more dead volume is recommended.
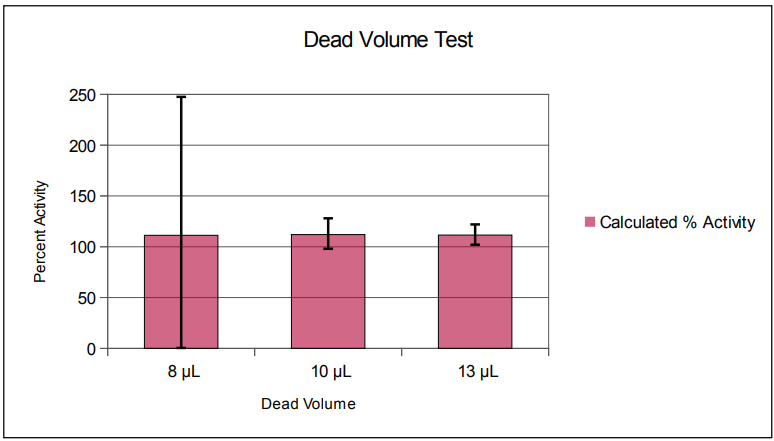
Figure 6. Calculated percent activity of the constant binding partner with 95% confidence interval error bars.
Tips for Successful Experiments
Tip 1: A 100 µL buffer wash is recommended before the start of the sample run (Figure 5). Testing showed better reproducibility of small sample draws when the extra buffer rinse was included (data not shown).
Tip 2: When using the 4000 or Autosampler, increase the volume of the buffer step after the sample draw to 1000 mL (Figure 5B). This will ensure the entire sample moves through the long sample line and passes over the bead pack.
Tip 3: Often, small volumes are used to decrease signal when working with higher CBP concentrations. To avoid using less than 3 or 5 µL volume draws, increase the flow rate of the buffer following the sample draw (Figure 5C). The sample should still run at the standard flow rate to improve the sample accuracy (Figure 5D). The faster flow rate draw following the sample will help to decrease the overall signal as there is less time for free CBP to bind to the solid phase, reducing capture percentage. Similar to Tip 2, if using the 4000 or Autosampler, make sure the volume of the buffer is at least 1000 µL.
Note: To add an extra line to any part of the timing file, click on the timing file where the extra row should be added and then select “Insert Row” under the Edit menu option.