
How to Guide 249
Whole Cell Kinetics Direct
How To Guide 249 • HG249R2 • 04 Sep 2025 • © Sapidyne Instruments Inc.
The KinExA® instrument can be used to measure the kon of a molecule to a cell surface receptor. For this experiment, a fixed number of cells are incubated with a fixed constant binding partner (CBP) and samples are measured at varying time points pre-equilibrium. Prior to running each sample, all cells must be removed from solution (if left in the solution they can clog the flow cell screen). The incubation time of the cells and CBP for each sample must be recorded for accurate data analysis. There are two methods for performing kinetics.
Method 1: Time Points Mixed Individually & Spun Down Together
- Use the information from previous equilibrium experiments and the Theoretical Binding Curve* to determine the following:
- The concentration of CBP needed to obtain a good signal.
- The concentration of cells that produces ~80% inhibition for the CBP concentration selected above.
- The volumes necessary to perform the assay. (Include additional volume so that the appropriate amount of supernatant can be removed without disturbing the cell pellet after samples have been centrifuged.)
- The number of samples to prepare.
- The time between the data points.
*Refer to Tech Note 220 — Theory Curve, A Guided Tour – Part 2: Kinetics Time Course (TN220) for more information on how to use the theory curve.
- Prepare the CBP and cells at two times the final concentration in order to achieve the correct concentrations after mixing. This is because the CBP and cells are prepared separately in sample buffer and then mixed together at the appropriate time.
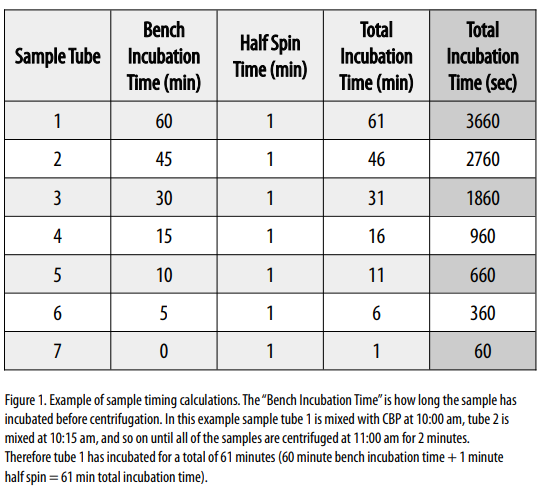
- Each sample will be mixed according to the total incubation needed for each data point. Refer to Figure 1 for an example of the timing calculations.
- For the 1st tube, mix an equal volume of CBP and cells, cap the tube, and set it on the rotator. Wait the calculated amount of time between data points and then prepare the next sample in the 2nd tube the same way. Continue until all samples have been mixed.
- Centrifuge all of the samples at the same time.
Note: Add half of this centrifuge time to the incubation time on the bench (Figure 1). - Remove the supernatant from each sample and place it in a clean tube with the corresponding sample tube number.
- Set up a “Kinetics Direct Whole Cell” template under the Timing Setup tab. Be sure to edit the number of samples in the sample set to the number of samples that were made.
- Run the experiment.
- Once the experiment is complete, input the total incubation time (in seconds) for each sample into the Binding Signals tab and analyze the experiment.
Method 2: Single Master Sample with Individual Removal
In this method, only one master sample is prepared and a single data point is removed at a specified time. Each data point is centrifuged immediately after this removal to stop the reaction.
- Use the information from the previous equilibrium experiments and the Theoretical Binding Curve to determine the following:
- The concentration of CBP needed to obtain a good signal.
- The concentration of cells that produces ~80% inhibition of the CBP concentration selected.
- The volumes necessary to perform the assay. Additional volume should be included so that the supernatant can be removed from each sample without disturbing the cell pellet.
- The number of samples you would like to run.
- The time between data points.
- Prepare:
- A single cell solution at your final intended cell concentration and in enough volume for all of your sample points. If this measurement is to be done at a specific temperature, incubate this solution at that temperature while preparing other materials.
- If time points are to be taken within a few minutes of each other, multiple centrifuges will need to be used. A spin time of 2 minutes at ~200 × g is recommended.
- Label each tube with each sample number. Pre-load counterbalances into your centrifuge.
- A table as shown in Figure 2 can be used to document various time points. The important time to measure is when the sample has started to be spun down in the centrifuge (“Time when centrifuge began”).
- When your cell solution is at the intended temperature, the experiment can be started. Spike in your CBP and begin a timer counting up. Mix the sample by inverting several times, then remove the volume necessary for a single data point (including dead volume) into a centrifuge tube. Immediately place this tube in the centrifuge and start the spin, being sure to record the time. The supernatant can be removed immediately after the sample has been spun down, into a new tube.
- If the reaction is to continue at a specific temperature, incubate your master sample at this temperature until your next time point.
- After all points have been spun down and collected, calculate the time that the samples were incubating (bench incubation time + half spin time).
- Set up a Kinetic Direct Whole Cell template under the Timing Setup tab. Be sure to edit the number of samples appropriately.
- Run the experiment.
- Once the experiment is complete, input the final incubation time (in seconds) for each sample into the Binding Signals tab and analyze the experiment.

KinExA® is a registered trademark of Sapidyne Instruments Inc.